Razor Pages are a new feature of ASP.NET Core that makes coding page-focused scenarios easier and more productive. Razor pages use handler methods to deal with the incoming HTTP request (GET/POST/PUT/Delete). These are similar to Action methods of ASP.NET MVC or WEB API. Razor Pages follow particular naming convention and that is also true for Handler methods. They also follow particular naming conventions and prefixed with “On”: and HTTP Verb like OnGet(), OnPost() etc. The handler methods also have asynchronous version: OnGetAsync(), OnPostAsync() etc. Calling these handler methods from jQuery Ajax is tricky. This post talks how to handle Ajax requests in ASP.NET Core Razor Pages.
Handle Ajax Requests in ASP.NET Core Razor Pages
Before we look into handling Ajax requests in ASP.NET Core Razor Pages, it’s important to understand how handler methods work. BTW, if you are new to ASP.NET Core Razor Pages, following articles will help.
- Getting started with Razor Pages in ASP.NET Core
- Introduction to Razor Pages in ASP.NET Core
- Introduction to ASP.NET Core Razor Pages
As mentioned earlier, the handler method follows a pattern. They are prefixed with “On” and the name of HTTP verb like,
- OnGet
- OnPost
- OnPut
- OnGetAsync
- OnPostAsync
- OnPutAsync
The OnGet method gets called on the page load and onPost gets called when the form gets submitted. The default template for ASP.NET Core 2.0 web application comes with a couple of razor pages. When you open About.cs.html file, you should see the following code.
| 1234 | public void OnGet(){Message = "Your application description page.";} |
The onGet() gets called when the request comes for the About page. Besides these default Handlers, we can also specify custom names. The custom name must come after the followed naming convention like,
- OnGetCountries()
- OnPostUserMaster()
- OnPostUserDetails()
In case of multiple POST handlers on the same page, how do you call them? You need to use asp-page-handler Tag Helper and assign the handler name. Like,
| 123456 | <form asp-page-handler="usermaster" method="post"><input type="submit" id="btnSubmit" value="Save Master" /></form><form asp-page-handler="userdetail" method="post"><input type="submit" id="btnSubmit" value="Save Details" /></form> |
Or, we can achieve the same thing with one form, and two submit inputs inside of that form:
| 1234 | <form method="post"><input type="submit" asp-page-handler="usermaster" value="Save Master" /><input type="submit" asp-page-handler="userdetail" value="Save Details" /></form> |
That’s enough for quick understanding. Read Razor Pages – Understanding Handler Methods for detailed information about handler methods.
Making Ajax Requests in ASP.NET Core Razor Pages
Now, let talk about calling the handler methods from jQuery Ajax. You must be thinking what is so different. Here is a GET handler method defined in “Demo” razor page.
| 12345678910 | public JsonResult OnGetList(){List<string> lstString = new List<string>{"Val 1","Val 2","Val 3"};return new JsonResult(lstString);} |
The HTML contains only div element without a form tag.
| 12 | <div id="dvItems" style="font-size:24px;"></div> |
The following jQuery code will call the OnGetList handler method available in Demo razor page and populate the list.
| 12345678910111213141516 | $.ajax({type: "GET",url: "/Demo/OnGetList",contentType: "application/json",dataType: "json",success: function (response) {var dvItems = $("#dvItems");dvItems.empty();$.each(response, function (i, item) {var $tr = $('<li>').append(item).appendTo(dvItems);});},failure: function (response) {alert(response);}}); |
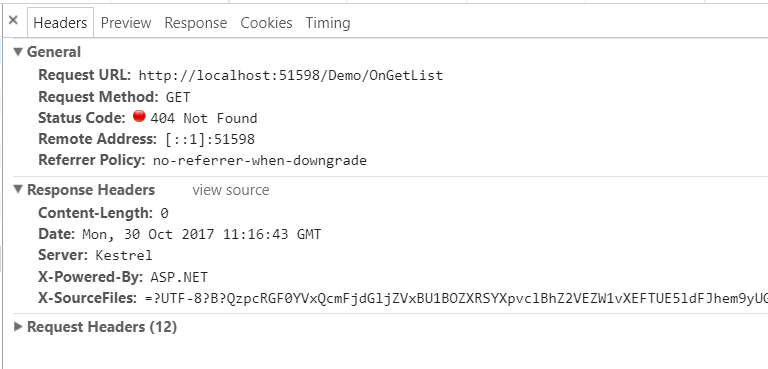
But, you will be surprised to see 404 not found error. See below screenshot.
To understand the reason for getting 404 error, we need to see how the handler methods are rendered. In one the earlier code sample, we created 2 forms and called 2 handler methods. Following is the output of generated HTML on the client side. For now, ignore the __RequestVerificationToken and look at the value of the action attribute of form tag.
| 1234567 | <form method="post" action="/Demo?handler=usermaster"><button class="btn btn-default">Save Master</button><input name="__RequestVerificationToken" type="hidden" value="CfDJ8KW5cuB058RCnNyZSLI7AUjUAtTwe54jQ4Z9Goyn3WKPcpVFYSFUM5J-JDFC3E-MZIUcyR0UnbrvrC_sHv6MbUONStuIMhqDc7i00pQiGkrzf3hK6t5gZFVrjUpyAcargow4zvKU_ISjdPfoLTNF588" /></form> <form method="post" action="/Demo?handler=userdetail"><button class="btn btn-default">Save Details</button><input name="__RequestVerificationToken" type="hidden" value="CfDJ8KW5cuB058RCnNyZSLI7AUjUAtTwe54jQ4Z9Goyn3WKPcpVFYSFUM5J-JDFC3E-MZIUcyR0UnbrvrC_sHv6MbUONStuIMhqDc7i00pQiGkrzf3hK6t5gZFVrjUpyAcargow4zvKU_ISjdPfoLTNF588" /></form> |
The thing to notice here is, the name of the handler is added to the form’s action as a query string parameter. We need to use similar URL pattern while making the jQuery Ajax call. Like,
| 12345678910111213141516 | $.ajax({type: "GET",url: "/Demo?handler=List",contentType: "application/json",dataType: "json",success: function (response) {var dvItems= $("#dvItems");dvItems.empty();$.each(response, function (i, item) {var $tr = $('<li>').append(item).appendTo(dvItems);});},failure: function (response) {alert(response);}}); |
Now, this should work. You can use the same approach for POST requests as well. Here is a POST handler method defined in “Demo” razor page.
| 12345678910 | public ActionResult OnPostSend(){List<string> lstString = new List<string>{"Val 1","Val 2","Val 3"};return new JsonResult(lstString);} |
The HTML contains only div element without a form tag.
| 12 | <div id="dvPostItems" style="font-size:24px;"></div> |
Here is jQuery Ajax call for the POST method.
| 12345678910111213141516 | $.ajax({type: "POST",url: "/Demo?handler=Send",contentType: "application/json; charset=utf-8",dataType: "json",success: function (response) {var dvItems = $("#dvPostItems");dvItems.empty();$.each(response, function (i, item) {var $tr = $('<li>').append(item).appendTo(dvItems);});},failure: function (response) {alert(response);}}); |
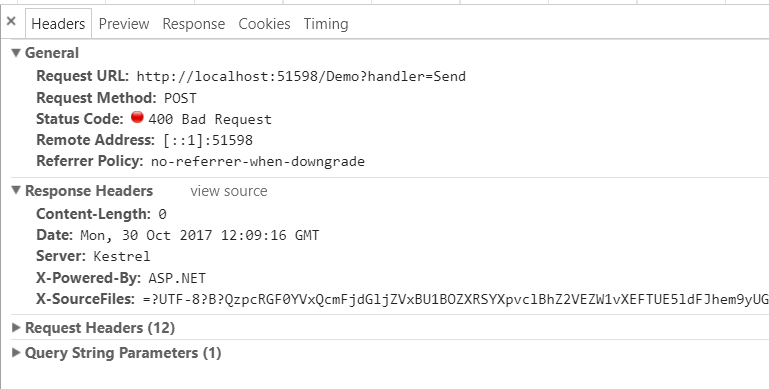
Bang!!! This gives you a 400 bad request error.
You must be wondering now, what’s wrong with the above code. Well, there is nothing wrong with the above code. The reason is,
Razor Pages are designed to be automatically protected from cross-site request forgery (CSRF/XSRF) attacks. You don’t have to write any additional code. Antiforgery token generation and validation is automatically included in Razor Pages. Here the request fails, there is no AntiForgeryToken present on the page.
There are 2 ways to add the AntiForgeryToken.In ASP.NET Core MVC 2.0 the FormTagHelper injects anti-forgery tokens for HTML form elements. For example, the following markup in a Razor file will automatically generate anti-forgery tokens:
| 123 | <form method="post"><!-- form markup --></form> |
Add explicitly using @Html.AntiForgeryToken()
To add AntiForgeryToken, we can use any of the approaches. Both the approaches add an input type hidden with name __RequestVerificationToken. The Ajax request should send the anti-forgery token in request header to the server. So, the modified Ajax request looks like,
| 1234567891011121314151617181920 | $.ajax({type: "POST",url: "/Demo?handler=Send",beforeSend: function (xhr) {xhr.setRequestHeader("XSRF-TOKEN",$('input:hidden[name="__RequestVerificationToken"]').val());},contentType: "application/json; charset=utf-8",dataType: "json",success: function (response) {var dvItems = $("#dvPostItems");dvItems.empty();$.each(response, function (i, item) {var $tr = $('<li>').append(item).appendTo(dvItems);});},failure: function (response) {alert(response);}}); |
Since the script sends the token in a header called X-CSRF-TOKEN, configure the antiforgery service to look for the X-CSRF-TOKEN header:
| 12345 | public void ConfigureServices(IServiceCollection services){services.AddMvc();services.AddAntiforgery(o => o.HeaderName = "XSRF-TOKEN");} |
Now, when the Post request is executed, it should work as expected. Below is another working example of POST request, sending data from client to server.
| 123456789101112131415161718192021222324252627282930 | $('#btnPost').on('click', function () {var item1 = $('#txtItem1').val();var item2 = $('#txtItem2').val();var item3 = $('#txtItem3').val();$.ajax({type: "POST",url: "/Demo?handler=Send",beforeSend: function (xhr) {xhr.setRequestHeader("XSRF-TOKEN",$('input:hidden[name="__RequestVerificationToken"]').val());},data: JSON.stringify({Item1: item1,Item2: item2,Item3: item3}),contentType: "application/json; charset=utf-8",dataType: "json",success: function (response) {var dvItems = $("#dvPostItems");dvItems.empty();$.each(response, function (i, item) {var $tr = $('<li>').append(item).appendTo(dvItems);});},failure: function (response) {alert(response);}});}) |
Here, we can’t access the passed data via query string as the querystring contains “?handler=Send” value. Hence, to access the passed value on the server, read the Request object’s body. Like,
| 1234567891011121314151617181920212223242526272829303132 | public ActionResult OnPostSend(){string sPostValue1 = "";string sPostValue2 = "";string sPostValue3 = "";{MemoryStream stream = new MemoryStream();Request.Body.CopyTo(stream);stream.Position = 0;using (StreamReader reader = new StreamReader(stream)){string requestBody = reader.ReadToEnd();if(requestBody.Length > 0){var obj = JsonConvert.DeserializeObject<PostData>(requestBody);if(obj != null){sPostValue1 = obj.Item1;sPostValue2 = obj.Item2;sPostValue3 = obj.Item3;}}}}List<string> lstString = new List<string>{sPostValue1,sPostValue2,sPostValue3};return new JsonResult(lstString);} |
The above code also deserialize the JSON data into PostData class object and below is the definition of PostData class.
| 123456 | public class PostData{public string Item1 { get; set; }public string Item2 { get; set; }public string Item3 { get; set; }} |
You can find the source code in the Github.
Summary
The post talks about ASP.NET Core Razer Pages handler methods naming conventions and creating named handler method. Razor Pages are designed to be protected from (CSRF/XSRF) attacks. Hence, Antiforgery token generation and validation are automatically included in Razor Pages. The post also provide solutions for making Ajax requests for Razor pages handler methods.
Thank you for reading. Keep visiting this blog and share this in your network. Please put your thoughts and feedback in the comments section.

